前言
近期为我的网站进行了一次整体的升级,修复了个人主页和云盘的诸多 bug,新增了更多功能。其中包括优化 Waline 的使用,在这里记录下来以供他人参考。
这里我使用的是 Hugo 以及 stack 主题,使用其他方式的可以更多的参考 waline 的官方文档。
迁移到最新版本 Waline
客户端
由于 stack 模板中所接入的 waline 版本为 V2,或者像我一样从更远古的版本就开始魔改的话引入的是 V1,因此这里我们先来迁移到 V3 版本。
直接按照官方文档中的引入方式修改代码即可,这里贴上我将 stack 模板修改后的代码。
layouts\partials\comments\provider\waline.html:
<link rel="stylesheet" href="https://unpkg.com/@waline/client@v3/dist/waline.css"/>
<div id="waline" class="waline-container"></div>
<style>
    .waline-container {
        background-color: var(--card-background);
        border-radius: var(--card-border-radius);
        box-shadow: var(--shadow-l1);
        padding: var(--card-padding);
        --waline-font-size: var(--article-font-size);
    }
    .waline-container .wl-count {
        color: var(--card-text-color-main);
    }
</style>

{{- $showReaction := (default true .Params.reaction) -}}
{{- with .Site.Params.comments.waline -}}
{{- $config := dict "el" "#waline" "dark" `html[data-scheme="dark"]` -}}
{{- $replaceKeys := dict "serverurl" "serverURL" "requiredmeta" "requiredMeta" "wordlimit" "wordLimit" "pagesize" "pageSize" "imageuploader" "imageUploader" "texrenderer" "texRenderer" "commentsorting" "commentSorting" "recaptchav3key" "recaptchaV3Key" "turnstilekey" "turnstileKey" -}}
{{- $replaceLocaleKeys := dict "reactiontitle" "reactionTitle" "gifsearchplaceholder" "gifSearchPlaceholder" "nickerror" "nickError" "mailerror" "mailError" "wordhint" "wordHint" "cancellike" "cancelLike" "cancelreply" "cancelReply" "uploadimage" "uploadImage" -}}

{{- range $key, $val := . -}}
    {{- if ne $val nil -}}
        {{- $replaceKey := index $replaceKeys $key -}}
        {{- $k := default $key $replaceKey -}}

        {{- if eq $k "locale" -}}
            {{- $locale := dict -}}
            {{- range $lkey, $lval := $val -}}
                {{- if ne $lval nil -}}
                    {{- $replaceLKey := index $replaceLocaleKeys $lkey -}}
                    {{- $lk := default $lkey $replaceLKey -}}

                    {{- $locale = merge $locale (dict $lk $lval) -}}
                {{- end -}}
            {{- end -}}
            {{- $config = merge $config (dict $k $locale) -}}
        {{- else if eq $k "reaction" -}}
            {{- $config = merge $config (dict $k (cond $showReaction $val false)) -}}
        {{- else -}}
            {{- $config = merge $config (dict $k $val) -}}
        {{- end -}}
    {{- end -}}
{{- end -}}

<script type="module">
    import { init } from 'https://unpkg.com/@waline/client@v3/dist/waline.js';
    init({{ $config | jsonify | safeJS }});
</script>
{{- end -}}
这里我使用的 VSCode 虽然安装了 Hugo Language and Syntax Support 插件,但依旧无法正确判断 Hugo 语言语法,倒数第三行会报错,只要能正常运行即可。
另外,除了引入 V3 以外,这里也包括了 locale 大小写的修复,后文会提到,以及在 FrontMatter 中新增了一个自定义属性 reaction,用以开关文章反应,默认为 true。
刷新网页,如果发现评论系统右下角变成了 Powered by Waline v3.3.0 就说明升级成功了。
如果你曾经已经接入 Waline 的更多功能例如统计,那么你可能需要注意按照官方的迁移指南修改你的代码。
服务端
由于数据库与服务端分开部署,所以升级服务端理所当然无需担心会丢失数据。
在管理端 UI 界面最上方可以看到当前最新版本为 @waline/vercel@1.32.0。
官方给的方式是将自己的 waline github 库中的 package.json 中的 @waline/vercel 版本修改为最新的即可。当然理论上来说,我们这里用的是 latest,直接在 Vercel 控制台中重部署即可。
我这里版本差的有点多,所以选择将自己的库 pull 下来,然后替换成官方的 waline/example at main · walinejs/waline · GitHub 再 push 回去。
接着回到 Vercel 控制台,看到已经重新部署了,打开管理端也可以看到上方不再显示版本更新提示。
关于 Vercel 墙内 Dns 污染
这里顺带一提,污染会导致墙内无法访问,进而墙内无法加载 Waline。
解决方法:自定义域名,并且 CNAME 换成 cname-china.vercel-dns.com。
本身访问速度已经较快了,建议关掉自定义域名 Cloudflare 代理,不然会出现 Cloudflare 的代理 ip 地址。
配置邮件提醒
本步骤需要修改较多的环境变量,你可以在这里查看相关的服务端环境变量配置的详细信息:服务端环境变量 | Waline。
配置 Gmail 邮箱
首先需要对谷歌邮箱账号进行一些设置。
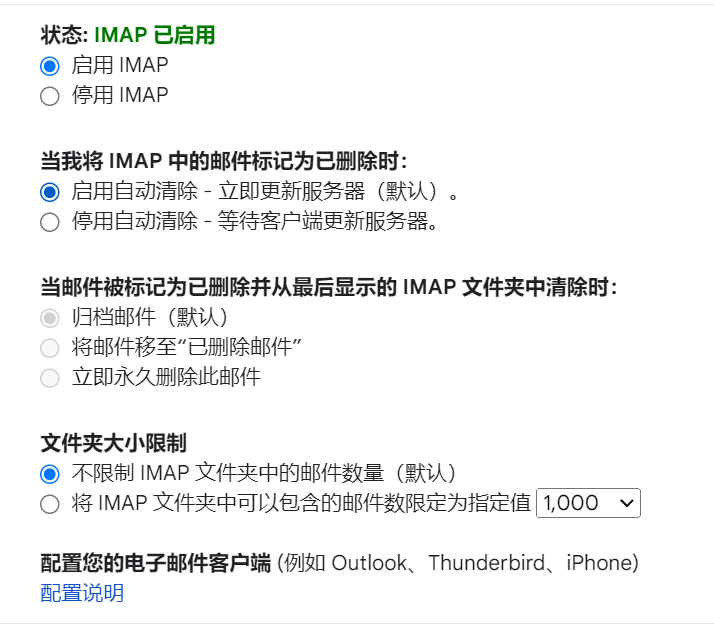
在邮箱设置的转发和 POP/IMAP 中启用 IMAP。
然后在这里生成谷歌账号的应用专用密码,复制下来一会用。
随后按照官方指南 评论通知 | Waline 配置 Vercel 上的环境变量即可:
-
SMTP_SERVICE:填Gmail -
SMTP_USER:填谷歌邮箱 -
SMTP_PASS:填刚刚获取的应用专用密码,有 16 位,记得删除空格 -
SITE_NAME:填博客的名字 -
SITE_URL:要带https://,不带最后一个斜杠,例如https://blog.reincarnatey.net -
AUTHOR_EMAIL:填自己常用的邮箱,用来接受评论通知
套上自己的 Cloudflare 邮箱
当然直接用谷歌邮箱发还是过于粗糙,这里希望再套上自己的 Cloudflare 邮箱实现更好的效果。这里的操作就类似于创建 Cloudflare 邮箱然后绑定到谷歌邮箱的别名上,详细可以在网络上搜索相关博客,这里只简单记录一下步骤。
-
在 Cloudflare 电子邮件路由设置中创建邮箱地址,需要这一步是因为待会要收一个验证邮件(当然可以像我一样设置 Catch-All 就不用这一步)
-
谷歌账号需要开启一些设置(例如开启双重验证)
-
像刚刚一样再创建一个应用专用密码
-
在谷歌邮箱账号设置中在账号与导入页面选择添加其他电子邮件地址
-
第一步名称和电子邮件地址填写你要导入的名称和电子邮件地址,例如
失迹的博客和noreply@reincarnatey.net,勾选作为别名 -
SMTP服务器:填smtp.gmail.com -
用户名:填你的谷歌邮箱 -
密码:填刚刚获取的应用专用密码,记得删空格
-
-
别名电子邮件会收到一封邮件,完成验证
-
添加 Vercel 的环境变量为新的邮箱信息,与在谷歌那边填的一致即可
-
SENDER_NAME:自定义发件人名字,如失迹的博客 -
SENDER_EMAIL:自定义发件地址,如noreply@reincarnatey.net
-
这样就完成别名的设置了,如果要精致一点还可以为这个邮箱设置一个 gravatar。
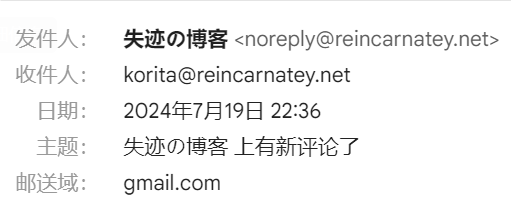
我们发送一个回复,可以看到收到的邮件的发件人信息已经设置好了。
使用模板样式
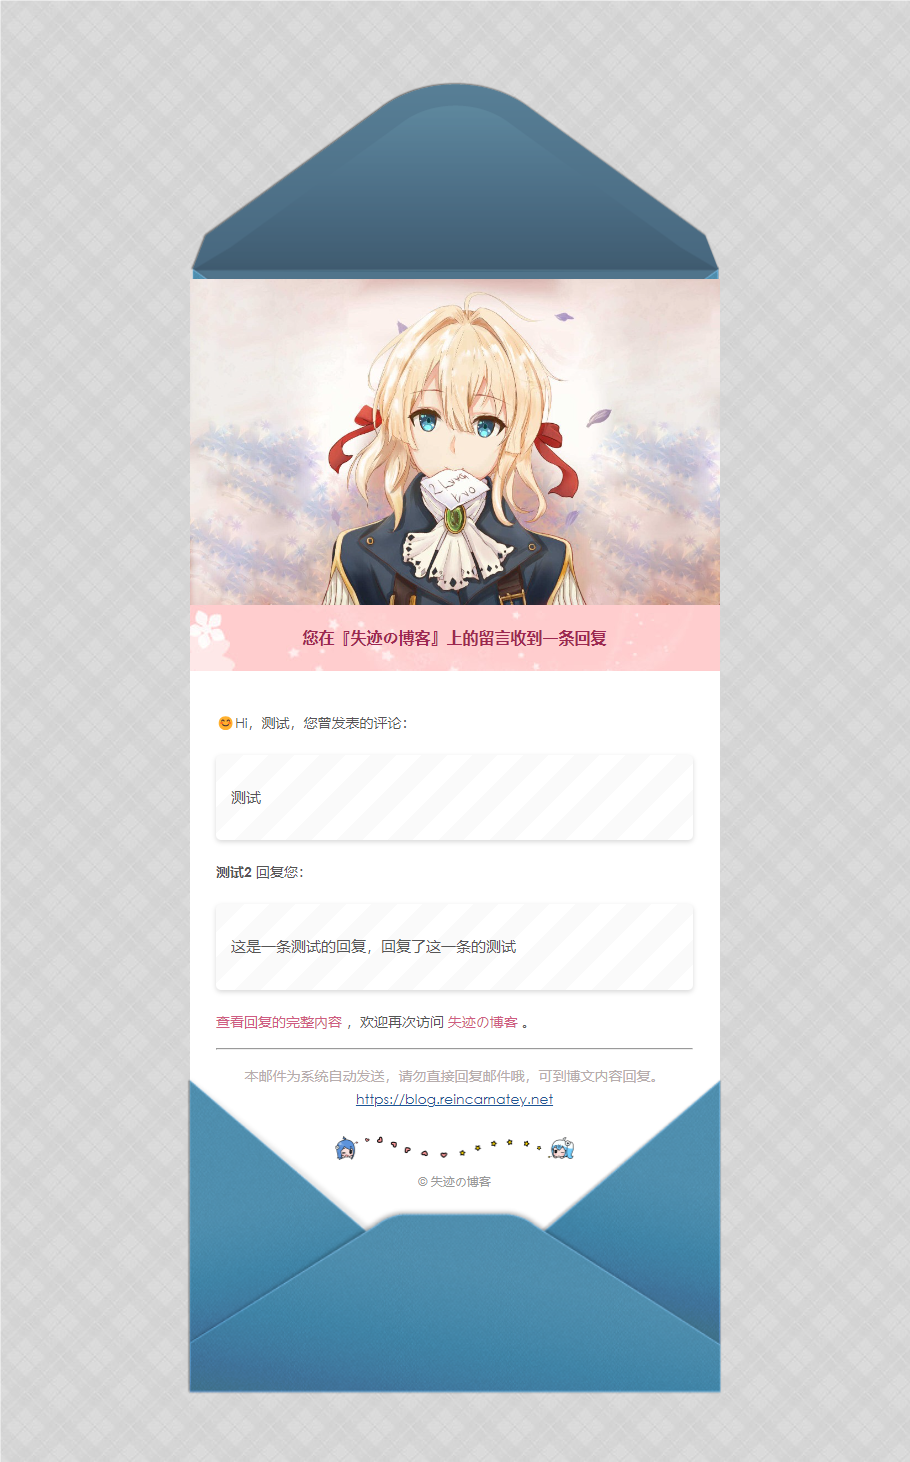
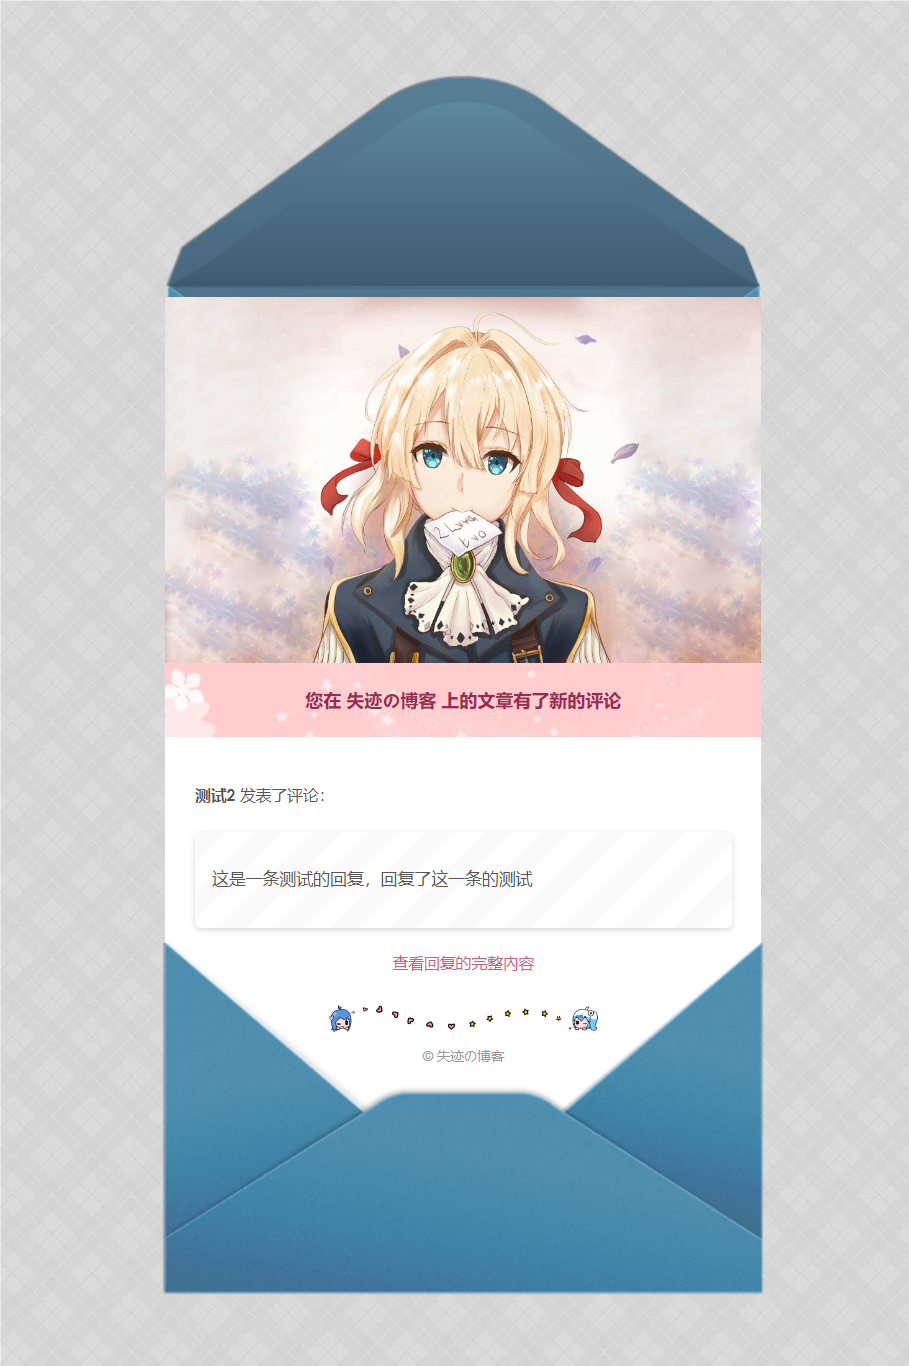
这里我使用的模板修改自 SaraKale’s blog,非常感谢。
效果展示:
-
MAIL_SUBJECT:{{parent.nick | safe}},您在 『{{site.name | safe}}』 上的评论收到了回复 -
MAIL_TEMPLATE:<div style="background: url(https://tva3.sinaimg.cn/large/c56b8822ly1h62npb7s1ej201y01y0lh.jpg);padding:40px 0px 20px;margin:0px;background-color:#FFCDCE;width:100%;"> <style type="text/css"> @media screen and (max-width:600px) { .afterimg, .beforeimg { display: none !important } } </style> <div style="border-radius: 10px 10px 10px 10px;font-size:14px;color: #555555;width: 530px;font-family:'Century Gothic','Trebuchet MS','Hiragino Sans GB',微软雅黑,'Microsoft Yahei',Tahoma,Helvetica,Arial,'SimSun',sans-serif;margin:50px auto;max-width:100%;background: ##ffffff;"> <img class="beforeimg" style="width:530px;height:317px;z-index:-100;pointer-events:none" src="https://npm.elemecdn.com/hexo-butterfly-envelope/lib/before.png"> <img src="https://npm.elemecdn.com/hexo-butterfly-envelope/lib/violet.jpg" style="width:100%;overflow:hidden;pointer-events:none;margin-top: -120px;"> <div style="width:100%;background:#f8d1ce;color:#9d2850;background-image: -moz-linear-gradient(0deg, rgb(67, 198, 184), rgb(255, 209, 244));height: 66px;background: url(https://tva2.sinaimg.cn/large/c56b8822ly1h61tb7tagcj20ii01u3yc.jpg) left top no-repeat;display: flex;justify-content: center;flex-direction: column;"> <p style="font-size:16px;font-weight: bold;text-align:center;word-break:break-all;margin:0;"> 您在<a style="text-decoration:none;color: #9d2850;" href="{{site.url}}">『{{site.name | safe}}』</a>上的留言收到一条回复</p> </div> <div class="formmain" style="background:#fff;width:100%;max-width:800px;margin:auto auto;overflow:hidden;margin-bottom: -155px;"> <div style="margin:40px auto;width:90%;"> <p>😊Hi,{{parent.nick}},您曾发表的评论:</p> <div style="background: #fafafa repeating-linear-gradient(-45deg,#fff,#fff 1.125rem,transparent 1.125rem,transparent 2.25rem);box-shadow: 0 2px 5px rgba(0, 0, 0, 0.15);margin:20px 0px;padding:15px;border-radius:5px;font-size:15px;color:#555555;"> {{parent.comment | safe}}</div> <p><strong>{{self.nick}}</strong> 回复您:</p> <div style="background: #fafafa repeating-linear-gradient(-45deg,#fff,#fff 1.125rem,transparent 1.125rem,transparent 2.25rem);box-shadow: 0 2px 5px rgba(0, 0, 0, 0.15);margin:20px 0px;padding:15px;border-radius:5px;font-size:15px;color:#555555;"> {{self.comment | safe}}</div> <p><a style="text-decoration:none; color:#cf5c83" href="{{site.postUrl}}" target="_blank"> 查看回复的完整內容 </a>,欢迎再次访问<a style="text-decoration:none; color:#cf5c83" href="{{site.url}}" target="_blank"> {{site.name}} </a>。 <hr /> <p style="font-size:14px;color:#b7adad;text-align:center;position: relative;z-index: 99;"> 本邮件为系统自动发送,请勿直接回复邮件哦,可到博文内容回复。<br />{{site.url}}</p> </p> <img src="https://npm.elemecdn.com/hexo-butterfly-envelope/lib/line.png" style="width:100%;margin:25px auto 5px auto;display:block;pointer-events:none"> <p class="bottomhr" style="font-size:12px;text-align:center;color:#999">© 失迹的博客</p> </div> </div> <img class="afterimg" style="width:535px;height:317px;z-index:100;margin-left: -3px;" src="https://npm.elemecdn.com/hexo-butterfly-envelope/lib/after.png"> </div> </div> -
MAIL_SUBJECT_ADMIN:您有一条新的评论 -
MAIL_TEMPLATE_ADMIN:<div style="background: url(https://tva3.sinaimg.cn/large/c56b8822ly1h62npb7s1ej201y01y0lh.jpg);padding:40px 0px 20px;margin:0px;background-color:#FFCDCE; width:100%;"> <style type="text/css"> @media screen and (max-width:600px) { .afterimg, .beforeimg { display: none !important } } </style> <div style="border-radius: 10px 10px 10px 10px;font-size:14px;color:#555555;width: 530px;font-family:'Century Gothic','Trebuchet MS','Hiragino Sans GB',微软雅黑,'Microsoft Yahei',Tahoma,Helvetica,Arial,'SimSun',sans-serif;margin:50px auto;max-width:100%;background: ##ffffff;"> <img class="beforeimg" style="width:530px;height:317px;pointer-events:none" src="https://npm.elemecdn.com/hexo-butterfly-envelope/lib/before.png"> <img src="https://npm.elemecdn.com/hexo-butterfly-envelope/lib/violet.jpg" style="width:100%;overflow:hidden;pointer-events:none;margin-top: -120px;"> <div style="width:100%;background:#f8d1ce;color:#9d2850;background-image: -moz-linear-gradient(0deg, rgb(67, 198, 184), rgb(255, 209, 244));height: 66px;background: url(https://tva2.sinaimg.cn/large/c56b8822ly1h61tb7tagcj20ii01u3yc.jpg) left top no-repeat;display: flex;justify-content: center;flex-direction: column;"> <p style="font-size:16px;font-weight: bold;text-align:center;word-break:break-all;margin:0;"> 您在 <a style="text-decoration:none;color:#9d2850;" href="{{site.url}}" target="_blank">{{site.name}}</a> 上的文章有了新的评论</p> </div> <div class="formmain" style="background:#fff;width:100%;max-width:800px;margin:auto auto;overflow:hidden;margin-bottom:-155px;z-index:100;"> <div style="margin:40px auto;width:90%;"> <p><strong>{{self.nick}}</strong> 发表了评论:</p> <div style="background: #fafafa repeating-linear-gradient(-45deg,#fff,#fff 1.125rem,transparent 1.125rem,transparent 2.25rem);box-shadow: 0 2px 5px rgba(0, 0, 0, 0.15);margin:20px 0px;padding:15px;border-radius:5px;font-size:15px;color:#555555;"> {{self.comment | safe}}</div> <p style="text-align:center;position: relative;z-index: 99;"><a style="text-decoration:none;color:#cf5c83" href="{{site.postUrl}}" target="_blank">查看回复的完整內容</a> </p> <img src="https://npm.elemecdn.com/hexo-butterfly-envelope/lib/line.png" style="width:100%;margin:25px auto 5px auto;display:block;pointer-events:none"> <p class="bottomhr" style="font-size:12px;text-align:center;color:#999">© 失迹的博客</p> </div> </div> <img class="afterimg" style="width:535px;height:317px;margin-left:-3px;" src="https://npm.elemecdn.com/hexo-butterfly-envelope/lib/after.png"> </div> </div>
直接在 Vercel 设置环境变量即可,大胆复制进去。注意如果选择压行的话会丢掉一部分空格,需要手动补上否则不美观。
更多的 Waline 客户端配置
可以在官方文档 组件属性 | Waline 中查看。
放上这里我的配置:
waline:
    serverURL: https://waline.reincarnatey.net/
    lang: zh-CN
    search: false
    pageview: true
    comment: true
    emoji:
        - https://npm.elemecdn.com/@waline/emojis@1.1.0/bmoji
        - https://npm.elemecdn.com/@waline/emojis@1.1.0/bilibili
        - https://npm.elemecdn.com/@waline/emojis@1.1.0/weibo
    reaction:
        - https://npm.elemecdn.com/@waline/emojis@1.1.0/bilibili/bb_heart_eyes.png
        - https://npm.elemecdn.com/@waline/emojis@1.1.0/bilibili/bb_thumbsup.png
        - https://npm.elemecdn.com/@waline/emojis@1.1.0/bilibili/bb_zhoumei.png
        - https://npm.elemecdn.com/@waline/emojis@1.1.0/bilibili/bb_grievance.png
        - https://npm.elemecdn.com/@waline/emojis@1.1.0/bilibili/bb_dizzy_face.png
        - https://npm.elemecdn.com/@waline/emojis@1.1.0/bilibili/bb_slap.png
    requiredMeta:
        - nick
    locale:
        admin: 站长
        sofa: 还没有人评论哦!快来抢沙发吧~
        placeholder: 欢迎留下宝贵的评论!请留下正确的邮箱以便有回复时进行邮箱提醒,请勿发布任何与本文章无关的内容。
        reactionTitle: 这篇文章对你有帮助吗?
        reaction0: 非常有用
        reaction1: 有帮助
        reaction2: 一般
        reaction3: 无帮助
        reaction4: 看不懂
        reaction5: 有错误
需要注意的是由于 yaml 读取为统一小写,而 Waline 的配置又大小写敏感,所以需要专门的步骤将大小写转换。
我在前文提供的 layouts\partials\comments\provider\waline.html 已包含了基本配置以及 locale 配置的大小写修复,其他配置同理。同时也包含新增了一个文章 FrontMatter 属性用以控制是否显示文章反应:reaction: true。
接入浏览量与评论数统计
文章页
在 config.yaml 的 waline 配置中将 pageview 与 comment 都设置为 true。
并且修改 layouts\partials\article\components\details.html,将末尾的 <footer> 中的内容修改为:
<footer class="article-time">
    {{ if not .Date.IsZero }}
        <div>
            {{ partial "helper/icon" "date" }}
            <time class="article-time--published">
                {{- .Date.Format (or .Site.Params.dateFormat.published "Jan 02, 2006") -}}
            </time>
        </div>
    {{ end }}

    {{ if .Site.Params.article.readingTime }}
        <div>
            {{ partial "helper/icon" "clock" }}
            <time class="article-words">
                {{ $fixedWordCount := add .WordCount 224}}
                约{{ div $fixedWordCount 225 }}分钟,共{{ .WordCount }}字
            </time>
        </div>
    {{ end }}

    <div>
        {{ partial "helper/icon" "view" }}
        <time class="article-pageview">
            <span class="waline-pageview-count" data-path="{{.RelPermalink}}">0</span> 次浏览
        </time>
    </div>

    <div>
        {{ partial "helper/icon" "comment" }}
        <time class="article-comment">
            <span class="waline-comment-count" data-path="{{.RelPermalink}}">0</span> 条评论
        </time>
    </div>
</footer>
另外虽然有提供 .ReadingTime 变量以供估算阅读时长,但官方设置的速度或许是基于英文的,个人感觉误差较大。所以这里根据网络上的数据,成人每分钟阅读约 200-250 字进行向上取整估算。
至于图标,按照这里所使用的方式下载对应的图标 view.svg 和 comment.svg,并修改成适配暗黑模式后,扔到 \assets\icons 下即可。
由于文章页会直接引入完整的 Waline,所以不需要额外的引入了。可以看到在文章页面已经可以正常显示修改的内容了。
页脚
这里希望在所有页面的页脚展示主页的浏览量。
由于除了文章以外的页面不会引入浏览量统计,所以这里需要额外引入,在 layouts\partials\footer\footer.html 的 <footer> 内添加:
<script type="module">
  import { pageviewCount } from 'https://unpkg.com/@waline/client@v3/dist/pageview.js';

  pageviewCount({
    serverURL: "{{.Site.Params.comments.waline.serverURL}}"
  });
</script>
然后在页脚相关代码中,你需要展示的地方添加上显示的 span 即可,例如在某个地方添加:
共 <span class="waline-pageview-count" data-path="/">0</span> 次浏览
可以看到各页面都可以成功显示首页浏览量,同时这里悄悄解决了首页中浏览量显示的问题。
这里也可以测试,首页浏览量:0
首页浏览量:<span class="waline-pageview-count" data-path="/">0</span>
首页
由于首页不开启评论功能,而页脚中只引入了浏览量统计,所以首页文章列表中显示不了评论数。我们希望能够显示出文章列表中各文章的评论数,需要额外的方式进行引入。
在 layouts\index.html 中 </section> 后面加上:
<script type="module">
    import { commentCount } from 'https://unpkg.com/@waline/client@v3/dist/comment.js';

    commentCount({
        serverURL: "{{.Site.Params.comments.waline.serverURL}}"
    });
</script>
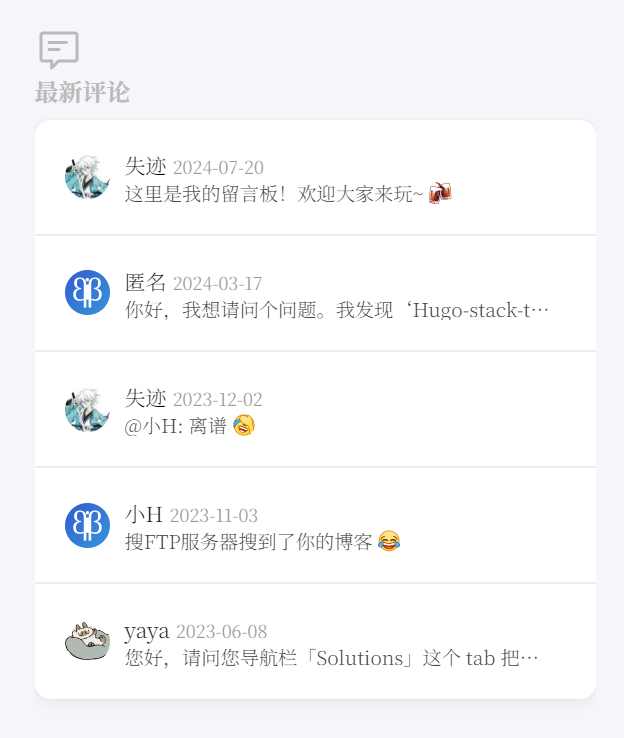
可以看到主页文章列表中,浏览量与回复数统计数据已经正常填充。
接入最新评论挂件
可以在 客户端 API | Waline 页面查看这个挂件的 API。
这里我们以侧边栏组件的形式引入这个挂件,并设计成只有首页会出现。
在 assets\scss\partials\widgets.scss 的最下方添加:
/* Recent Comment widget */
.widget.recentComment {
    .recent-comment-list {
        border-radius: var(--card-border-radius);
        box-shadow: var(--shadow-l1);
        background-color: var(--card-background);
    }

    .recent-comment-list-item {
        display: flex;
        padding: 0 1.25em;
        align-items: center;

        &:not(:last-of-type) {
            border-bottom: 1.4px solid var(--card-separator-color);
        }
    }

    .recent-comment-card {
        flex: 1;
        width: 0;
        padding: 20px 10px !important;

        p {
            font-size: .8em;
            margin-top: 3px;
            margin-bottom: 0px;
            white-space: nowrap;
            overflow: hidden;
            text-overflow: ellipsis;
            color: var(--card-text-color-secondary);
        }
    }

    .recent-comment-avatar {
        width: 3rem;
        border-radius: 50%;
    }

    .recent-comment-nick {
        font-size: .875em;
        color: var(--card-text-color-main);
    }

    .recent-comment-time {
        font-size: .75em;
        color: var(--card-text-color-tertiary);
    }

    .vemoji,
    .wl-emoji {
        height: 1.25em;
        margin: -0.2em .1em;
    }
}
创建文件 layouts\partials\widget\recent-comment.html:
{{ if .IsHome }}
<section class="widget recentComment" hidden>
    <div class="widget-icon">
        {{ partial "helper/icon" "comment" }}
    </div>
    <h2 class="widget-title section-title">最新评论</h2>

    <div class="recent-comment-list"></div>
</section>

<script type="module">
    import { RecentComments } from 'https://unpkg.com/@waline/client@v3/dist/waline.js';

    RecentComments({
        serverURL: "{{.Site.Params.comments.waline.serverURL}}",
        count: 5,
    }).then((comments) => {
        if (comments.comments.data.length) {
            document.getElementsByClassName('recentComment')[0].removeAttribute("hidden");
            document.getElementsByClassName('recent-comment-list')[0].innerHTML = comments.comments.data.map((comment) =>
                `<a class="recent-comment-list-item" href="${comment.url}" target="_blank">
                    <img class="recent-comment-avatar" src="${comment.avatar}"/>
                    <div class="recent-comment-card">
                        <div>
                            <span class="recent-comment-nick">${comment.nick}</span>
                            <span class="recent-comment-time">${new Date(comment.time).toISOString().split('T')[0]}</span>
                        </div>
                        <p>${comment.comment.replaceAll("<br>", " ").replaceAll("\n", " ").replace(/<\/?a.*?>/g, "")}</p>
                    </div>
                </a>`
            ).join('');
        }
    });
</script>
{{ end }}
当然我们还需要在 config.yaml 中开启这个组件:
params:
    widgets:
        enabled:
            - recent-comment # 加上这一条
最外面那一个 if 就是用来限制只在首页出现的。这里设定成获取到数据后再显示,以及将评论内容中的链接全部去掉了,设定成展示最近的 5 条评论。
由于官方样式令人堪忧,所以这里是获取数据后自定义。关于 comment 的属性,可以在 API | Waline 中查看关于 BaseWalineResponseComment 的接口,这里简单介绍几个比较有用的:
| 属性 | 类型 | 含义 | 说明 |
|---|---|---|---|
| avatar | string | 头像链接 | |
| comment | string | 评论内容 | 渲染成 html 后的 |
| like | number | 评论喜欢数 | |
| link | string | 用户地址 | 用户自己填写的,不建议用,避免出现乱七八糟的 backlink 和影响 SEO |
| nick | string | 用户昵称 | 用户自己填写的 |
| orig | string | 原始评论 | |
| time | number | 评论时间 | 时间戳,单位毫秒 |
| url | string | 原文章地址 |
当然,这里没有考虑到国际化的需求以及更多的可扩展性,欢迎有想法的朋友实现更高拓展性和更美观的侧边栏组件。
后续计划再更新一次,添加显示评论所在的原文章,会在之后关于侧边栏的文章中再次提及。
除此之外 Waline 还有一个 UserList 挂件,我这里并不需要,要接入的话也是类似的。
结语
至此,我们已经捣鼓完了 Waline 大部分功能。你可以在官方手册中了解到更多的配置项以及我未提及的插件系统。
很遗憾此前我曾对模板进行过一次较大的改动,实现了例如独立出来的 Solutions 题解区以及 Algorithms 算法标签等,由于过于久远已经不记得调整内容无法写成文章,同时也因为放弃了拓展性的修改,无法合适地将我修改过后的主题开源。
当然,对博客主题的改造还远不止于此。后续的改造我也会保持记录,并发布文章,欢迎在评论区插眼或是订阅 RSS 以便关注后续更新。
有不足之处请见谅,有错误欢迎指正,也欢迎大家交换友链或是在评论区玩耍~
附录
参考文献
- Walin 官网
- 使用Waline给Hexo静态博客添加评论系统 | Quantum Bit
- 评论插件 Waline 之邮件通知配置 | Oragekk’s Blog
- Gmail发送邮件的配置方法_gmail smtp-CSDN博客
- waline邮件通知模板样式一览 | SaraKale’s blog
- 函数 | Hugo官方文档
版权信息
本文原载于 reincarnatey.net,遵循 CC BY-NC-SA 4.0 协议,复制请保留原文出处。